-
[React]리액트에서 react-draft-wysiwyg , DraftJS 사용하여 에디터(Editor) 적용 후 Redux로 상태관리하기React 2020. 8. 31. 23:32
✔ 개요
-
블로그 글쓰기나 기타 게시글을 쓸 때 textarea로 작성을 하면 많이 밋밋하고, 기능적으로 많은 구현을 하기 힘듭니다. 그렇기 때문에 글쓰기가 필요하고 게시글을 만들 때 오프소스 에디터들을 사용하여 좀 더 많은 기능의 게시글을 작성할 수가 있습니다.
-
많은 오프소스 에디터들 중에 react-draft-wysiwyg(리액트드래프트위지윅) 에디터를 사용해봤습니다.
다른 오픈소스 기반 리액트 에디터의 종류를 사용해보고 싶으면 참고
-
사용하면서 react-draft-wysiwyg의 장점은 기본적인 사용은 쉽고, 유명한 페이스북에서 관리하는 에디터인 draft.js를 사용하기 쉽게 리액트로 구성한 것입니다.
-
하지만, 기능적으로 디테일이 부족하다는 점이 있다고 느꼈습니다.
예를 들어, 한글을 입력할 때 바로바로 onChange가 되지않아 글자를 작성하고 바로 Shift + Enter키(
<p>태그 없이 띄어쓰기)를 할 때 상태값이 변하지않아 꼬이는 현상이 발생합니다. 그에 따라, 기존에 작성중이던 글자들이 삭제되는 현상이 발생합니다.
이 문제는 저의 코딩방식에 문제인 줄 알았지만 react-draft-wysiwyg의 공식 사이트의 데모에서도 같은 현상이 발생합니다.
또한, 이미지 등록 시 발생하는Unknown DraftEntity key: null.에러가 발생하는데, 이 문제도 이미지를 등록 후 한글로 작성 시에 생기는 오류인거 같습니다.
최근에도 Issues에 올라오는 것으로 보아 아직까지 해결이 안된거 같습니다.
개인 프로젝트를 진행하면서 버그사항을 정리해본 것입니다. 참고해주세요.🌈 react-draft-wysiwyg 설치 및 기본 설정
draft.js를 기반으로 작성된 것이기 때문에draft-js도 함께 설치해줍니다.
// npm $ npm i react-draft-wysiwyg draft-js // yarn $ yarn add react-draft-wysiwyg draft-jsstyled-components를 사용하여 css스타일을 잡아주었습니다.
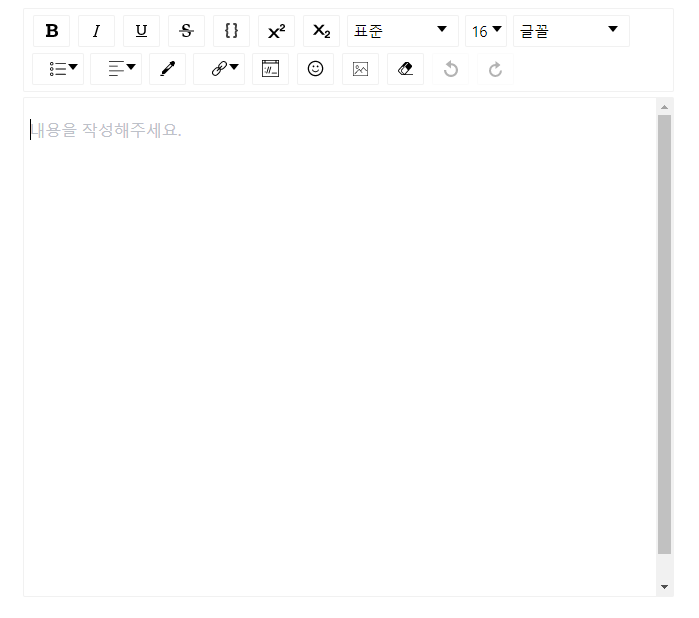
import React, { useState } from 'react'; import { Editor } from 'react-draft-wysiwyg'; import 'react-draft-wysiwyg/dist/react-draft-wysiwyg.css'; import styled from 'styled-components'; import { EditorState } from 'draft-js'; const MyBlock = styled.div` .wrapper-class{ width: 50%; margin: 0 auto; margin-bottom: 4rem; } .editor { height: 500px !important; border: 1px solid #f1f1f1 !important; padding: 5px !important; border-radius: 2px !important; } `; const TestEditorForm = () => { // useState로 상태관리하기 초기값은 EditorState.createEmpty() // EditorState의 비어있는 ContentState 기본 구성으로 새 개체를 반환 => 이렇게 안하면 상태 값을 나중에 변경할 수 없음. const [editorState, setEditorState] = useState(EditorState.createEmpty()); const onEditorStateChange = (editorState) => { // editorState에 값 설정 setEditorState(editorState); }; return ( <MyBlock> <Editor // 에디터와 툴바 모두에 적용되는 클래스 wrapperClassName="wrapper-class" // 에디터 주변에 적용된 클래스 editorClassName="editor" // 툴바 주위에 적용된 클래스 toolbarClassName="toolbar-class" // 툴바 설정 toolbar={{ // inDropdown: 해당 항목과 관련된 항목을 드롭다운으로 나타낼것인지 list: { inDropdown: true }, textAlign: { inDropdown: true }, link: { inDropdown: true }, history: { inDropdown: false }, }} placeholder="내용을 작성해주세요." // 한국어 설정 localization={{ locale: 'ko', }} // 초기값 설정 editorState={editorState} // 에디터의 값이 변경될 때마다 onEditorStateChange 호출 onEditorStateChange={onEditorStateChange} /> </MyBlock> ); }; export default TestEditorForm;-
이렇게 하면 리액트 Hooks를 사용하여 간단하게 상태관리를 하여 동작시킬 수 있습니다.
-
작성을 해보면 잘 작동이되는 것을 확인할 수 있습니다.
📌 주의할 점은 그냥 엔터를 치게되면 엔터칠때마다
<p></p>태그가 붙게되어pre블록과code블록은 원하지 않는 형태로 나타납니다. 그렇기 때문에Shift + Enter키를 사용하여<br/>태그만 붙게 해주어 사용해야됩니다. -
더 자세한 기능은 공식문서를 참고해주세요.
🌈 에디터로 작성한 상태값을 HTML태그로 변환하여 게시글 띄우기
- 현재 상태에서
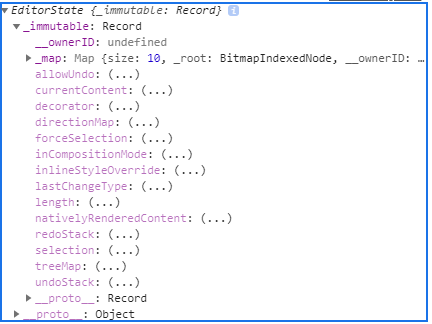
console.log()을 찍어보면 아래 이미지와 같은 값으로 나오게 되는데 이editorState값을 HTML태그로 변경해줄려면draftjs-to-html의 도움이 필요합니다.
// draftjs-to-html 라이브러리 설치 $ npm i draftjs-to-html- 이젠
div태그 안에editorState상태 값을 HTML태그로 변환하여 넣을 수 있습니다.
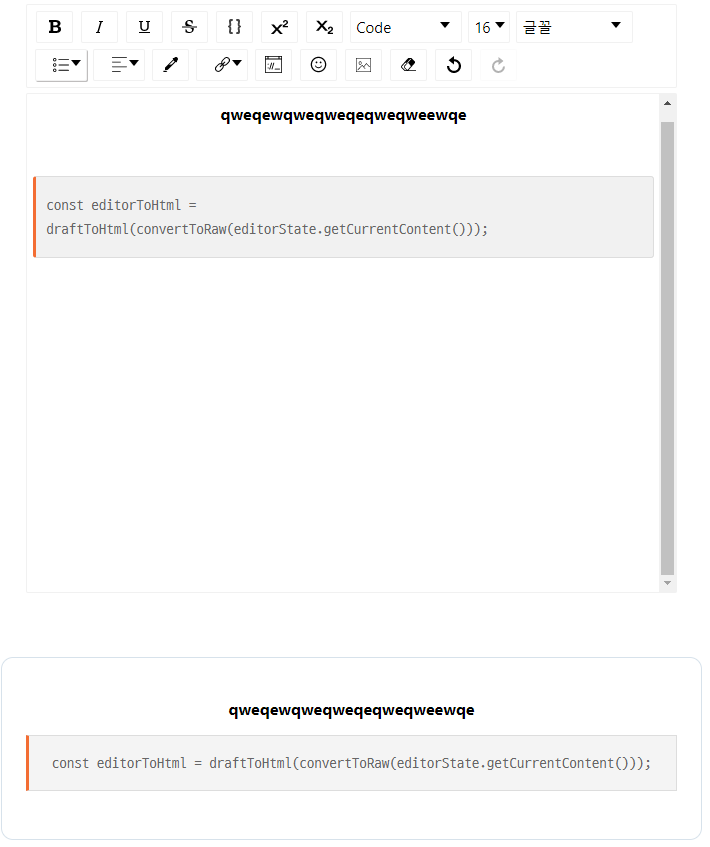
// 생략.. // convertToRaw: editorState 객체가 주어지면 원시 JS 구조로 변환. import { EditorState, convertToRaw } from 'draft-js'; // convertToRaw로 변환시켜준 원시 JS 구조를 HTML로 변환. import draftToHtml from 'draftjs-to-html'; // 생략.. // 변환시켜준 editorState 값을 넣기 위한 div 태그 css const IntroduceContent = styled.div` position: relative; border: 0.0625rem solid #d7e2eb; border-radius: 0.75rem; overflow: hidden; padding: 1.5rem; width: 50%; margin: 0 auto; margin-bottom: 4rem; `; const TestEditorForm = () => { // 생략.. // editorState의 현재 contentState 값을 원시 JS 구조로 변환시킨뒤, HTML 태그로 변환시켜준다. const editorToHtml = draftToHtml(convertToRaw(editorState.getCurrentContent())); return ( <> // 생략.. // dangerouslySetInnerHTML: https://ko.reactjs.org/docs/dom-elements.html#dangerouslysetinnerhtml <IntroduceContent dangerouslySetInnerHTML={{__html: editorToHtml}}/> </> ); }; export default TestEditorForm;- 이제 에디터에 작성한 상태값이 변경이 될때마다 잘 바뀌는 것을 볼 수 있습니다.
- 하지만, 해보시면 아시겠지만 한글로 작성 할 시점에 바로바로 변경이 되는것이 아니라 띄어쓰기나
.을 찍을때 마다 변경하는 것을 볼 수 있습니다. - CSS는 하고싶은 대로 변경을 해주면 됩니다.
🌈 HTML태그를 draft.js로 변환하여 Editor에 초기값 세팅하기
- 이 경우는 게시글을 수정할 때 필요로 합니다.
- 게시글을 수정할 때는 기존에 작성된 값을 넣어주어 수정을 할 수 있게 해주어야 합니다. 그렇기 때문에 받은 HTML의 값을 draft Editor가 알아볼 수 있도록 변환해준 뒤 넣어 주어야 합니다.
- 변환하기 위해서는
html-to-draftjs를 사용합니다.
$ npm i html-to-draftjs- 이제 게시글을 수정하는 상황으로 생각하고 임의의 값을 선언해주어 변환해보겠습니다.
import React, { useState, useEffect } from 'react'; // 생략.. // ContentState: https://draftjs.org/docs/api-reference-content-state/ import { EditorState, convertToRaw, ContentState } from 'draft-js'; // 생략.. import htmlToDraft from 'html-to-draftjs'; // 생략.. const TestEditorForm = () => { // 생략.. const htmlToEditor = `<pre>const editorToHtml = draftToHtml(convertToRaw(editorState.getCurrentContent()));</pre> <p style="text-align:center;"><strong>ㅎㅇㅎㅇㅎㅇㅎㅇㅎㅇㅎㅇㅎㅇㅎㅇ </strong></p>`; useEffect(() => { const blocksFromHtml = htmlToDraft(htmlToEditor); if (blocksFromHtml) { const { contentBlocks, entityMap } = blocksFromHtml; // https://draftjs.org/docs/api-reference-content-state/#createfromblockarray const contentState = ContentState.createFromBlockArray(contentBlocks, entityMap); // ContentState를 EditorState기반으로 새 개체를 반환. // https://draftjs.org/docs/api-reference-editor-state/#createwithcontent const editorState = EditorState.createWithContent(contentState); setEditorState(editorState); } // 처음 마운트됬을 때만 실행되야 된다. // eslint-disable-next-line },[]); return ( // 생략.. ); }; export default TestEditorForm;-
보통 수정할 때에는 처음에 랜더링될때의 값만 넣어주어야하기 때문에 빈배열을 넣어주어 처음 랜더링될때만 실행합니다.
-
이렇게 하면 처음에 초기값이 적용된 것을 확인할 수 있습니다.
-
여기서
// eslint-disable-next-line를 해준 이유는 경고 메시지가 뜨기 때문입니다.이 방법 말고 아래 방법처럼
useRef를 사용하여 처음 랜더링될 때(true일 때)만 실행되고 그 다음부터는false로 변경해주어 처음 랜더링될 때만 실행되게 할 수 있습니다.
import React, { useState, useEffect, useRef } from 'react';
// 생략..
const TestEditorForm = () => {
  // 생략..
  const rendered = useRef(false);

  useEffect(() => {
    if (rendered.current) return;
    rendered.current = true;
    const blocksFromHtml = htmlToDraft(htmlToEditor);
    if (blocksFromHtml) {
      const { contentBlocks, entityMap } = blocksFromHtml;
      const contentState = ContentState.createFromBlockArray(contentBlocks, entityMap);
      const editorState = EditorState.createWithContent(contentState);
      setEditorState(editorState);
    }
  },[htmlToEditor]);
  return (
    // 생략..
  );
};

export default TestEditorForm;
🌈 Redux를 사용하여 상태 관리하기
-
여기서는 자세하게 설명하지 않겠습니다. 이유는 너무 많은 내용을 담을거 같아서 내용이 길어지기 때문입니다.
-
간략하게 설명하겠습니다. 이 editor를 사용하여 사이드 프로젝트인 스터디 모집 사이트에서 사용했습니다. 자세한 내용은 Github에 올려두었습니다.
-
아래는 리덕스까지 적용한 간단한 예제 코드 입니다.
-
간단하게 보여주기 위해서
component와container를 분리하지 않았습니다. -
사용하실때에는 분리하여 사용하시기 바랍니다.
import React, { useState, useEffect, useRef, useCallback } from 'react'; import { Editor } from 'react-draft-wysiwyg'; import 'react-draft-wysiwyg/dist/react-draft-wysiwyg.css'; import styled from 'styled-components'; import { EditorState, convertToRaw, ContentState } from 'draft-js'; import draftToHtml from 'draftjs-to-html'; import htmlToDraft from 'html-to-draftjs'; import { useDispatch, useSelector } from 'react-redux'; import { changeField } from 'src/modules/write'; const MyBlock = styled.div` .wrapper-class { width: 50%; margin: 0 auto; margin-bottom: 4rem; } .editor { height: 500px !important; border: 1px solid #f1f1f1 !important; padding: 5px !important; border-radius: 2px !important; } `; const IntroduceContent = styled.div` position: relative; border: 0.0625rem solid #d7e2eb; border-radius: 0.75rem; overflow: hidden; padding: 1.5rem; width: 50%; margin: 0 auto; margin-bottom: 4rem; `; const TestEditorForm = () => { const dispatch = useDispatch(); const { content } = useSelector(({ write }) => ({ content: write.content, })); const [editorState, setEditorState] = useState(EditorState.createEmpty()); const rendered = useRef(false); // 리덕스 스토어 연결 const onChangeField = useCallback((payload) => dispatch(changeField(payload)), [dispatch]); // HTML 변환 공통 함수 const editorToHtml = editorState => { return draftToHtml(convertToRaw(editorState.getCurrentContent())) } const onEditorStateChange = (editorState) => { setEditorState(editorState); // 리덕스 changeField onChangeField({ key: 'content', value: editorToHtml(editorState), }); }; useEffect(() => { if (rendered.current) return; rendered.current = true; const blocksFromHtml = htmlToDraft(content); if (blocksFromHtml) { const { contentBlocks, entityMap } = blocksFromHtml; const contentState = ContentState.createFromBlockArray(contentBlocks, entityMap); const editorState = EditorState.createWithContent(contentState); setEditorState(editorState); } },[content]); return ( <> <MyBlock> <Editor wrapperClassName="wrapper-class" editorClassName="editor" toolbarClassName="toolbar-class" toolbar={{ list: { inDropdown: true }, textAlign: { inDropdown: true }, link: { inDropdown: true }, history: { inDropdown: false }, }} placeholder="내용을 작성해주세요." localization={{ locale: 'ko', }} editorState={editorState} onEditorStateChange={onEditorStateChange} /> </MyBlock> <IntroduceContent dangerouslySetInnerHTML={{ __html: editorToHtml(editorState) }} /> </> ); }; export default TestEditorForm;- 에디터에 작성한 내용
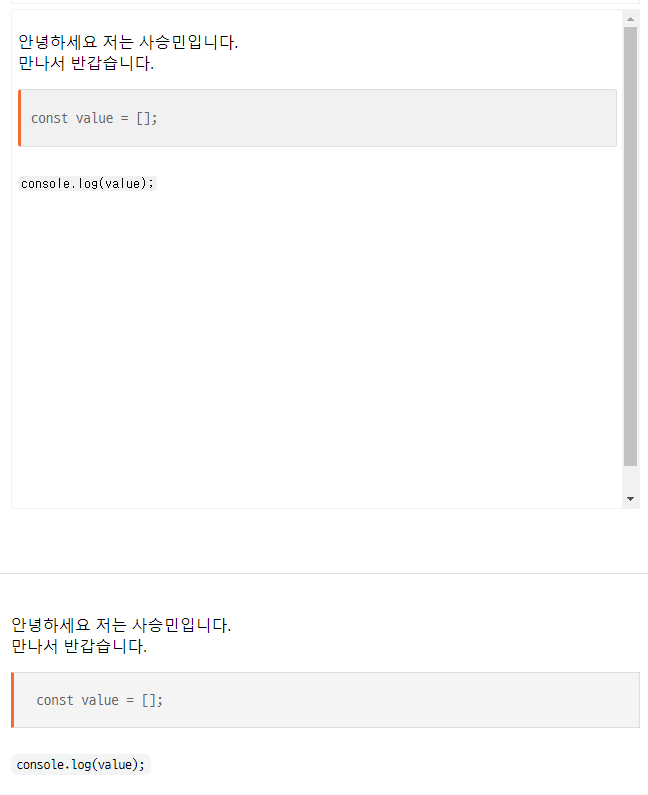
redux dev tool로 확인한 리덕스 스토어 상태

📌 마무리하며..
-
이제 리덕스를 사용하여
react-draft-wysiwyg과draft-js를 사용할 수 있습니다. -
더 자세히 보고싶은 분들은 Github의 container부분, components 부분, redux 부분 확인해주시기 바랍니다.😀
-
다음은
react-draft-wysiwyg에서 이미지를 업로드하는 방법을 포스팅하겠습니다. -
쓰다보니 길어졌는데 수정사항이나 개선사항이 있으면 댓글로 피드백 부탁드립니다. 🙏 감사합니다.
'React' 카테고리의 다른 글
[React] 리액트에서 react-moment, moment.js 사용하여 실시간으로 변경되는 시간 만들기 (3) 2020.08.23 🌈 SPA(싱글 페이지 애플리케이션) (0) 2020.07.26 [React] 함수형 컴포넌트의 React hooks (0) 2020.06.23 -